Mfr varenr. RM-TE0127
POLYMAKER POLYFLEX TPU95 FILAMEN
LulzBot
License: None 3D Printing
Currently, I am working on a project using the XRP to draw the DigiKey logo. To draw it properly, I need to be able to lift a marker with the robot’s servo as the robot travels from letter to letter. I initially used rubber bands and treads from XRP wheels, but they had a problem with the marker slipping and not maintaining the desired position. To overcome this issue, I created a 3D-printed holder using Fusion 360. The holder would attach the servo arm and solve the slipping problem.
To start the model, I measured the marker that I would be using and found the diameter to be 18mm, so I drew a circle that size. I offset that circle 1mm to the outside to give the holder a wall thickness.
I extruded the ring of the model 8mm high. This gives the holder enough height to be able to grip the marker as it is lifted.
I drew a 10mm x 4mm box on the right side of the ring, 9.5mm from the center of the ring.
I extruded the box 8mm high to match the rest of the ring.
Then, I created a sketch on the new box. I drew another box that was 8mm wide by 6mm high since I was planning on printing this out of TPU, and I wanted it slightly undersized to fit tight against the servo arm. I also added radiuses to the corners of the box to make it easier to print and stronger.
I used the extrude tool to cut the newly drawn box symmetrically out both sides of the box. In this case, the sketch plane was the center of the previous box instead of the face. If it had been the face, I could have changed the direction to one side and the distance to 4mm.
However, I decided that 0.5mm might be a little too thin for the outside wall, so I extruded it another 1mm to give it extra strength.
With the design finished, I needed to export it so I could slice and print the part. To export an STL file from Fusion, there are two different ways to do it. The first is to click on the new page button to the left of the save button and click on the Export button.
An export popup box will then appear. Under the Type dropdown, scroll down until you find STL Files, and click on that. You can also change the name of the file if you so choose. Once that is completed, click the export button. You may get a Job status popup like the one shown below that will show the progress of the export. Once the status shows complete, your STL will be in the folder you chose to export to.
The second way to export an STL from Fusion 360 is under the same menu shown before. Look for the 3D Print option.
Click on this menu button, and a small 3D Print toolbar pops out. Select the object or model that needs to be exported by clicking on the select box next to the selection section and then click on the model. It should then say 1 selected on that box. Next, there is the option to select a format (STL is what I use most. However, most slicers also accept 3MF files as well) and the refinement of the model. This is a very basic model, so I left the refinement set to low. If the model was much more detailed, you could increase this to make sure you don’t lose any of that detail during the conversion process. On the bottom of the toolbar, under the output section, it gives the option to send the file directly to a 3D print utility such as PreForm, Cura, or Custom. The Custom option allows you to select the slicer program that is typically used to slice your models. I use the LulzBot Edition of Cura, so notice below the Custom box, next to Application, it shows CuraLE. To choose which program, you will need to find the Application .exe file location for the slicer is that used on your hard drive. Once everything is complete, click the OK button at the bottom of the toolbar.
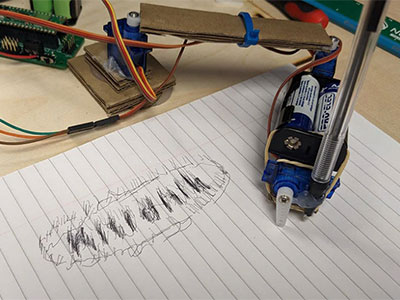
I set up my slicer for Polymaker TPU and sliced the model. I transferred the GCode to my LulzBot SideKick 747 and started the print. After about 30 minutes (including preheating, leveling, and print time) I had the finished part. With a bit of testing, I learned that it was better to place the holder on from the servo arm side and slip it up to just before the lifter portion of the arm (see image below for reference). This keeps a bit of tension on the marker to hold it in place and allows it to flex enough to not cause too much resistance.
Here, you can see the marker holder in action:
If you would like to download your own file to print, you can find it here: https://www.thingiverse.com/thing:6416465
If you need to make modifications, I’ve also included a STEP file on the Thingiverse page, which should be compatible with most CAD programs.