Mfr Part # 4500
CLUE NRF52840 EXPRESS
Adafruit Industries LLC
License: See Original Project Displays
Courtesy of Adafruit
Guide by Carter Nelson
Overview
Knowing one's altitude, height above sea level, is useful for many applications. Airplane pilots use it, so they don't run into the ground or each other. Hikers and mountain climbers use it to know where they are and how far to the summit. Etc.
There are various ways to determine altitude. Pressure based altitude computation is a common method and Adafruit sells numerous pressure sensors that can report an altitude. But to get an accurate value for altitude from pressure, there are a few important details to consider. In this guide we will go over the specifics of how pressure is used to compute altitude and learn about those important details.
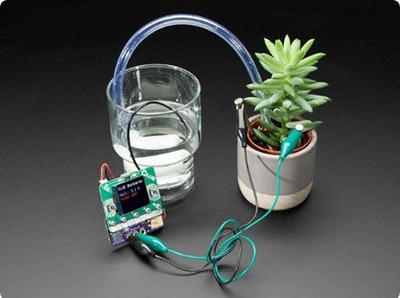
To help illustrate things in a real world application, we will use an Adafruit CLUE board and CircuitPython to create a simple little altimeter and take it into the mountains.
Put your yodelin' hat on and let's get started!
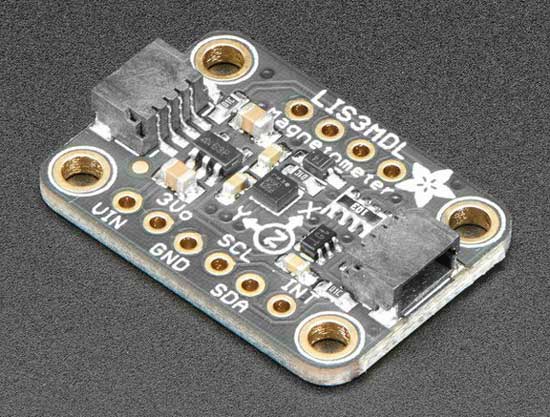
Parts
The Atmosphere
Image courtesy of the Earth Science and Remote Sensing Unit, NASA Johnson Space Center (Photo ID ISS045-E-27869)
Ah, the atmosphere. It's the lovely air that's all around us. We are all generally familiar with several properties of this atmosphere, like temperature, humidity, etc. You can just walk outside and feel those right away.
There is also pressure. You don't quite sense that the same way, but it's there. If you've ever had your ears pop while going up in an elevator, that's due to the change in pressure.
In the above image, note how thin the atmosphere appears in relation to the scale of the Earth. It's often compared to the outer skin of an onion. But that's where we all hang out :)
The Standard Atmosphere
As we will see, pressure and temperature change with altitude. In reality, they also change with time (ex: midnight vs. high noon) and location (ex: equator vs. poles). To provide atmospheric values an engineer can use in design calculations, the idea of a "standard atmosphere" is used. Just think of this as the atmospheric values averaged over all locations and times. The results are then made available via publications, like this:
An example atmosphere reference publication. Get your copy here.
That example is the 1962 version of the U.S. Standard Atmosphere. It was updated several times, with the most recent being the 1976 version:
The 1976 U.S. Standard Atmosphere. Get your copy here.
There is also an International Standard Atmosphere.
These publications are nothing more than page after page of tables that provide atmospheric values for any given altitude. The tables come from various equations which the publications also discuss. In 1976, computers were expensive, so these books of tables were a cheaper solution than putting those equations into a computer. Luckily, that is no longer the case and nowadays one would simply use any number of available computer-based options, like this Python library:
Python Ambiance Standard Atmosphere Library.
How Things Change with Altitude
OK, so let's look at how pressure and temperature change with altitude in this standard atmosphere model. Here are some plots that show this. These were created using the Python module ambiance linked above.
The vertical axis is height, with the bottom being sea level and the top being 80km (that's very high). Pressure decreases with altitude in a bendy curve sort of way. Temperature is wacky, it sometimes decreases, sometimes stays the same, sometimes increases.
Even though the Earth's atmosphere is thin relative to the overall size of the Earth (see image at top of this page), it is pretty tall when compared with the highest point on Earth - Mt. Everest. In this guide, we are mainly interested in altitudes on the Earth's surface, like places where we could actually stand. So, we don't need to worry about anything above the summit of Everest. Let's zoom in.
There! These two plots show the variation in pressure and temperature for the altitudes we are interested in - anywhere your feet are touching the ground. Now things look much simpler, just two happy little lines.
Note how pressure changes with altitude. Specifically - pressure decreases as altitude increases. We will use that fact to create our pressure-based altimeter. First, we need a way to measure pressure, so let's look at how pressure sensors work.
Pressure Sensors
It's a little difficult to appreciate how significant the changes in pressure within the atmosphere can be. The following experiment is a fun way to get a good general idea.
Go to a high altitude, like a mountain summit. Take an empty plastic water bottle and remove the cap so it fills with air with a pressure at that altitude. Now put the cap on tightly so it seals in that air. Then go down in altitude. The air inside stays at the lower pressure of the higher altitude. The outside air pressure will increase as you descend. If you can change altitude enough, the bottle will get crushed!
The difference in air pressure over 13,000 feet is enough to crush a plastic bottle!
Most pressure sensors work in a similar way. They have a sensing membrane which is like the plastic bottle. Here is what the inside of a sensor similar to the BMP280 on the Adafruit CLUE looks like:
The blue surface is just like the plastic bottle.
Think of the inside of the plastic bottle being like what is underneath that blue surface - a small pocket of trapped air. The upper side of the blue surface is like the outside of the bottle. It will see whatever air pressure it is surrounded by. So as the air pressure above the blue surface changes, it deflects, like the water bottle being crushed. This deflection is then sensed by the other electronics on the sensor. Turning that into pressure is just a matter of math.
Computing Altitude
Warning! This page contains ugly math. Sorry.
OK, so we have some understanding of how the atmosphere (in particular pressure) changes with altitude. And we've learned a bit about how pressure sensors work. So how can we use a pressure sensor to determine altitude?
Well, buried in that lovely U.S. Standard Atmosphere document, on page 12, is this sweet little equation 33a:
Bleh! That's a mess. But don't worry, we can simplify this greatly. This is a full form general purpose equation, so includes all the bells and whistles.
To make it a little clearer, here are the pressure (P) and altitude (H) that we are interested in:
Everything else in the equation is a constant - known values that we simply go look up. Here's a rundown:
We get R*, g0', and TM,b from Table 2. For our case, TM,b is T0.
We get Hb and LM,b from Table 4.
We are staying within the lowest region of the atmosphere, so b=0.
After a little hunting, we track down M0 in the text.
So, we simply plug in all those values and all that is left is pressure (P) and altitude (H).
But then, one more step. This equation computes pressure for a given altitude, but we want to go the other way - we want to compute altitude for a given pressure. So, we need to rearrange the equation.
Here's the end result after plugging in all those constants and rearranging:
Just plug in pressure P from our pressure sensor and out comes altitude H in meters. Neat!
Someone working at NWS/NOAA probably got tired of answering this one also and put together this little handy cheat sheet:
Yeah! Our answers agree.
Hey, Wait - There's Still a Variable
Oops. We still got a variable named Pb in the equation. What is that? Lead? Peanut butter? Princess Bubblegum? Nope. It's another pressure. And that's the crux of the problem when it comes to pressure-based altimeters. So, let's go into some detail about what Pb is and how to deal with it...
Dealing With Changes
The term Pb in our altitude equation is the pressure at the bottom of the atmospheric zone we are in. Since we are focusing on the lowest zone in the atmosphere, the bottom is zero altitude, aka sea level. So, we have:
The sea level pressure, SLP, is just what it says. If you went down to the ocean and measured the pressure right at the water, that would be sea level pressure. The problem is this:
Sea level pressure is not constant and changes with time and location.
Ugh! So how do we deal with SLP so we can compute altitude? There are two general approaches.
Calibrating Using Sea Level Pressure
This is super easy. If you know the current value for sea level pressure, SLP, then just plug it in. Then your pressure sensor measures your local pressure, P, and you can compute altitude, H, using:
Done!
The value for SLP needs to be for your current location, not the value from some other location miles away.
This is what airplane pilots do. Before takeoff, they listen over the radio to a local report that provides SLP at the airport's location. They then turn a dial on the airplane's altimeter to set that value. Then off they go!
A pilot turns the knob (arrow) until the reading in the Kollsman window (square) matches the reported local SLP.
OK, but what if you are standing out in the middle of the mountains? Maybe you could use a radio or smartphone to get a value for SLP. But it won't be for your specific location. Also, being in the mountains is typically an off-grid affair. So even getting SLP from the outside world is often not possible. In these situations, you rely on knowing your current altitude and using this next approach.
Calibrating Using Current Altitude
In this case, you are standing at a known altitude, H. The pressure sensor itself gives the current local pressure, P. We can then rearrange our altitude equation to back compute what sea level pressure, SLP, would be:
You specify H, the pressure sensor provides P, and from that we compute SLP. We store that value for SLP and use it from then on in our main altitude equation - the same one used in previous section.
But how do you know your current altitude H? If you knew it, why would you even need an altimeter? With this approach you typically use certain geographical features which have known altitudes. Here are some examples:
If you were standing at the outflow to Azure Lake, then your actual altitude is going to be very close to 4055 feet, same as the lake's altitude.
If you were standing on the summit of SE Twin Spire, aka Hard Mox, then your altitude is 8504 feet.
If you are on the trail at Park Creek Pass, then your altitude is between 6040 and 6080 feet - the closest contours. Using something like 6070 feet would be good.
When you reach one of these locations, you stop for a bit, have a snack, and calibrate your altimeter. Then off you go!
Altimeter Code
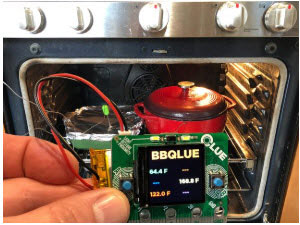
Let's use an Adafruit CLUE to bring this all together and demonstrate how a pressure-based altimeter works, and also why calibration is important.
Prepare the CLUE
Follow this guide for setting up CircuitPython on the CLUE:
Download the Project Bundle
Your project will use a specific set of CircuitPython libraries and the code.py file. To get everything you need, click on the Download Project Bundle link below, and uncompress the .zip file.
Hook your CLUE to your computer via a known good USB data+power cable. It should show up as a thumb drive named CIRCUITPY.
Using File Explorer/Finder (depending on your Operating System), drag the contents of the uncompressed bundle directory onto your board's CIRCUITPY drive, replacing any existing files or directories with the same names, and adding any new ones that are necessary.
Once the code restarts, the altimeter should start and show up on the CLUE screen. Head on to the next pages for instructions on how to use the altimeter code.
# SPDX-FileCopyrightText: 2020 Carter Nelson for Adafruit Industries
#
# SPDX-License-Identifier: MIT

import time
import struct
import displayio
import terminalio
from microcontroller import nvm
from adafruit_display_text import label
import adafruit_imageload
from adafruit_clue import clue

# ==| USER CONFIG |=====================
USE_METRIC = False
DISPLAY_UPDATE = 1
HOLD_TO_SET = 1
FONT = terminalio.FONT
BLUE = 0x53E4FF
ORANGE = 0xFCDF03
RED = 0xFA0000
DEBOUNCE = 0.05
SAMPLES = 10
DELAY = 0.05
STD_SLP = 1013.25
# ==| USER CONFIG |=====================

# configure pressure sensor (see Table 15 in datasheet)
clue._pressure.mode = 0x03  # normal
clue._pressure.overscan_pressure = 0x05  # x16
clue._pressure.overscan_temperature = 0x02  # x2
clue._pressure.iir_filter = 0x02  # 4
clue._pressure.standby_period = 0x01  # 62.5 ms

# restore saved sea level pressure from NVM
slp = struct.unpack("f", nvm[0:4])[0]
clue.sea_level_pressure = slp if 0 < slp < 2000 else STD_SLP

# --------------------------------------------------------------------
# D I S P L A Y    S E T U P
# --------------------------------------------------------------------

# create main display group
splash = displayio.Group()
clue.display.root_group = splash

# background
bg_bmp, bg_pal = adafruit_imageload.load(
    "images/network23.bmp", bitmap=displayio.Bitmap, palette=displayio.Palette
)
for i, color in enumerate(bg_pal):
    if color == 0xFF0000:
        bg_pal.make_transparent(i)
        break
background = displayio.TileGrid(bg_bmp, pixel_shader=bg_pal)

# a group for both altitude readouts
alti_readouts = displayio.Group(scale=6)

# altitude (corrected)
alti_disp = label.Label(FONT, text="12345", color=ORANGE)
alti_disp.anchor_point = (0, 0)
alti_disp.anchored_position = (7, 2)

# altitude (uncorrected)
alt2_disp = label.Label(FONT, text="12345", color=ORANGE)
alt2_disp.anchor_point = (0, 0)
alt2_disp.anchored_position = (7, 15)

# add both alti's to group
alti_readouts.append(alti_disp)
alti_readouts.append(alt2_disp)

# barometric pressure and temperature
aux_data = label.Label(FONT, text="P: 1234.56  T: 123.4", color=BLUE)
aux_data.anchor_point = (0, 0)
aux_data.anchored_position = (16, 212)

# calibration mode indicator
cal_mode = label.Label(FONT, text="   ", color=RED, scale=4, x=150, y=200)

# add everything to splash
splash.append(background)
splash.append(alti_readouts)
splash.append(aux_data)
splash.append(cal_mode)

# --------------------------------------------------------------------
# H E L P E R    F U N C T I O N S
# --------------------------------------------------------------------
def compute_altitude(barometric_pressure, sea_level_pressure):
    """Compute altitude (m) from barometric pressure (hPa) and sea level pressure (hPa)."""
    # https://www.weather.gov/media/epz/wxcalc/pressureAltitude.pdf
    return 44307.69396 * (1 - pow((barometric_pressure / sea_level_pressure), 0.190284))


def compute_sea_level_pressure(barometric_pressure, altitude):
    """Compute sea level pressure (hPa) from barometric pressure (hPa) and altitude (m)."""
    return barometric_pressure * pow((1 - (altitude / 44307.69396)), -5.2553)


def average_readings(samples=10, delay=0.05):
    """Return averaged readings for pressure and temperature."""
    pressure = 0
    temperature = 0
    for _ in range(samples):
        pressure += clue.pressure
        temperature += clue.temperature
        time.sleep(delay)
    return pressure / samples, temperature / samples


def recalibrate(current_sea_level_pressure=None):
    """Enter current altitude."""
    cal_mode.text = "CAL"
    alt2_disp.text = "-----"
    # wait for release if still being held
    while clue.button_a and clue.button_b:
        pass
    # get current value
    altitude = int(alti_disp.text)
    done = False
    while not done:
        now = time.monotonic()
        # increase
        if clue.button_a and not clue.button_b:
            altitude -= 1
            time.sleep(DEBOUNCE)
        # decrease
        elif clue.button_b and not clue.button_a:
            altitude += 1
            time.sleep(DEBOUNCE)
        # hold both to set
        elif clue.button_a and clue.button_b:
            while clue.button_a and clue.button_b:
                if time.monotonic() - now > HOLD_TO_SET:
                    print("done")
                    done = True
                    break
        alti_disp.text = "{:5d}".format(altitude)
    cal_mode.text = "   "
    # change clue settings
    if not USE_METRIC:
        altitude *= 0.3048
    # get current local pressure
    barometric_pressure, _ = average_readings(SAMPLES, DELAY)
    # compute sea level pressure and set
    clue.sea_level_pressure = compute_sea_level_pressure(barometric_pressure, altitude)
    # store in NVM for later use
    nvm[0:4] = struct.pack("f", clue.sea_level_pressure)


def update_display():
    """Update the display with latest info."""
    barometric_pressure, temperature = average_readings(SAMPLES, DELAY)
    altitude = compute_altitude(barometric_pressure, clue.sea_level_pressure)
    alt2tude = compute_altitude(barometric_pressure, STD_SLP)
    if not USE_METRIC:
        altitude *= 3.28084  # ft
        alt2tude *= 3.28084
        # barometric_pressure *= 0.0145038      # psi
        temperature = 32 + 1.8 * temperature  # deg F
    alti_disp.text = "{:5d}".format(int(altitude))
    alt2_disp.text = "{:5d}".format(int(alt2tude))
    aux_data.text = "P: {:7.2f}  T: {:5.1f}".format(barometric_pressure, temperature)


# --------------------------------------------------------------------
# M A I N    L O O P
# --------------------------------------------------------------------
last_update = time.monotonic()

while True:

    now = time.monotonic()

    # update display with latest info
    if now - last_update > DISPLAY_UPDATE:
        update_display()
        last_update = now

    # hold both to recalibrate
    if clue.button_a and clue.button_b:
        # accumulate hold time
        while clue.button_a and clue.button_b:
            if time.monotonic() - now > HOLD_TO_SET:
                print("set")
                recalibrate(clue.sea_level_pressure)
                break
        # wait for release if still being held
        while clue.button_a and clue.button_b:
            pass
Using the CLUE Altimeter
Here's a rundown on how to use to CLUE altimeter.
Normal Mode
When the program starts up, it enters normal mode. The pressure sensor is constantly read, and the altitude is computed and reported. Here is a summary of what is shown:
The idea with the two altitudes values is to provide a comparison between a "calibrated" or corrected (COR) value with one that is uncorrected. For the uncorrected value, the sea level pressure value used in the altitude calculation is that for a standard day (STD) of 1013.25 hPa.
The COR value is the one that will show your actual altitude based on the current calibration. If the calibration is wrong, then the reading will be wrong. Here's how to calibrate:
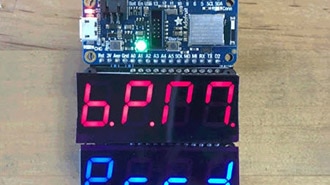
Calibration Mode
This is the mode you enter to calibrate the altimeter. The calibration is based on knowing your current altitude - so you will need that value.
To enter calibration mode, hold both buttons.
CAL appears in lower right corner. The STD readout changes to dashes.
Now use buttons to increase (INC) or decrease (DEC) the value in A to match the current altitude.
Once the value in A is set, hold both buttons again to save the calibration and exit CAL mode.
CAL disappears and the altitude values continue to update again.
And now you are back to Normal Mode.
Field Test Example
Let's take our CLUE altimeter for a hike and see how it does. Here's a map of the hike with several locations of known altitude indicated.
We will use point 1, Snow Lake, as our calibration point. When we get there, we'll stop and set the altimeter to the known altitude at that location (4016 ft). Then, we'll check the altitude again at points 2 and 3 and see how it compares.
Here we go:
At Snow Lake the altimeter was set to 4019 ft. The lake surface is 4016 ft, but we are standing with the altimeter several feet above that. :)
Note how the STD altitude is off by a couple hundred feet.
The trail at Gem Lake is 10's of feet above the actual lake surface of 4857 ft. So, the altimeter reading here of 4872 ft. seems OK.
That's the summit of Wright Mountain in the background - our next stop.
Standing on the summit of Wright Mountain we get a reading of 5436 ft. That's excellent agreement.
Oh, but we're holding the altimeter above the summit. OK...let's put it down on the actual summit.
Even better. The CLUE based altimeter is agreeing within a few feet! 5432 ft.
Note again how the STD based altitude is off by hundreds of feet.
And there you go. That's a perfect example of how a pressure-based altimeter can be used to provide surprisingly accurate results. It also hopefully illustrates how far off the altitude reading can be if proper calibration is not done.
FAQ
How often do I need to calibrate?
It all depends on the weather. With calm stable weather, you might be good for days. But if a weather system is moving in, your calibration may only be good for hours, maybe even less.
How much accuracy should I expect?
With a good recent calibration, you should be able to get altitude to within 10's of feet, or better, from a pressure-based altimeter. That can easily degrade to 100's of feet due to atmospheric changes throwing off the current calibration.
Why does the pressure sensor also provide temperature?
Pressure sensors are also sensitive to temperature. But all we want is pressure. Therefore, the effects of temperature must be taken into account and corrected. Thus, a separate temperature sensor is typically located near the pressure sensing element. That temperature is then used to compute a corrected pressure value. This correction can be quite complex.
Typically, the value from that temperature sensor is made available. But keep in mind that what it is providing is the temperature of the sensor itself.
Can I use that temperature to measure the air temperature?
Not reliably. Since the pressure sensor is relatively small (small thermal mass), it will change with air temperature and thus give a general indication. But it is, by necessity, buried down in the sensing element itself. So due to local self-heating and other effects, it can be off by many degrees.
What's better - GPS altitude or pressure-based altitude?
A decent and properly calibrated pressure altimeter will easily beat a GPS based altitude. Here we are only considering the GPS altitude derived directly from a 3D lock on multiple satellites, which is what a basic handheld GPS unit, or smartphone, will provide.